Post by e***@batelnet.bsPost by e***@batelnet.bsPost by Patrick TurnerHi!
For the next few posts a necessary, I will be asking some
questions about the innards of the cj pv5 preamp. So I would
appreciate help from anyone familiar with the unit.
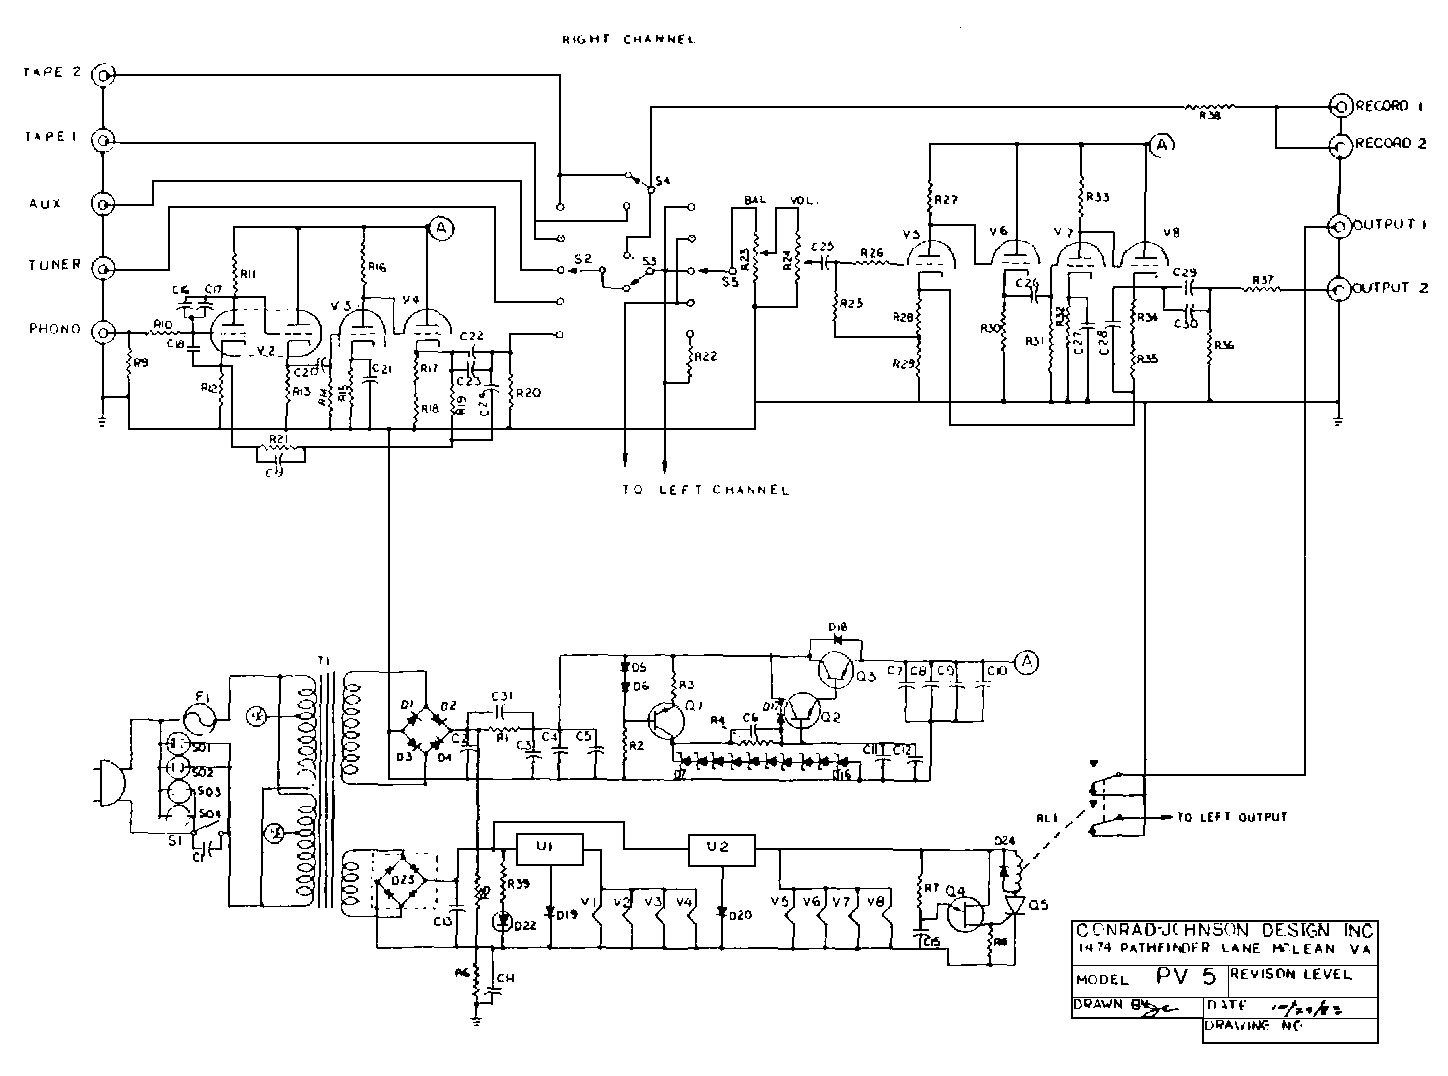
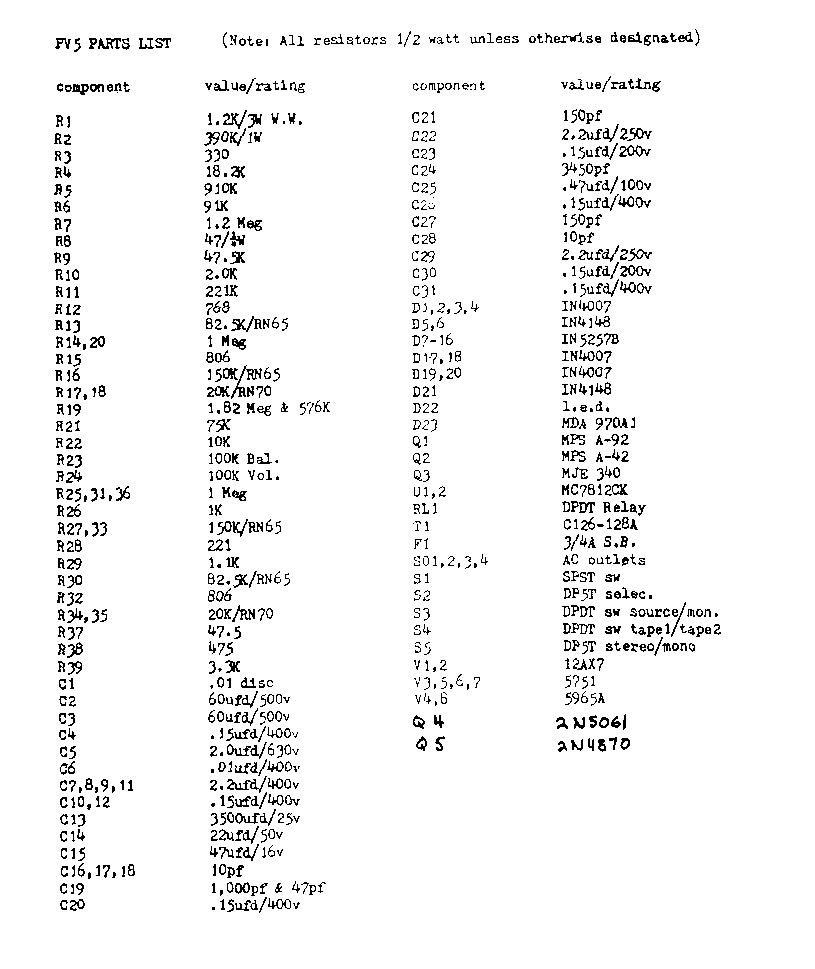
There is a bank of 4 blue 2.2 uf 400v caps in the power supply that
supply plate voltage to the tubes. Are these caps polarized? I
replaced them with auricaps of the same value which are non-polarized.
I powered up the unit, the normal delay occured, the output stage
clicked in and about 10 seconds later I was rewarded with a loud boom.
Now there is no output from the preamp.
Thanx.
ESTG/
Hehe, The God Of Triodes doesn't like ppl who
fiddle around with tube gear without having a deep understanding of what
thay are doing.
He sure doesn't like ppl fitting fancy-shmancy audiophile whatsit do-das
that may make the sound worse, although ppl on the Net have said
the replacements will improve the sound.
Maybe a cap you put in exploded because it shorted internally
from the applied Vdc being higher than the 400V rated Auricaps.
Or an Auricap was faulty.
Or you made a wiring mistake,
Or a splash of solder fell over two places in the circuit
and caused something to heat up.
Non polarized polypropylene caps like Auricaps
can be used where electrolytic polarised caps may now be used.
But the dc voltage rating must be high enough.
Guys doing such replacements of caps should understand the schematic,
and if they cannot
get a copy, be prepared to read the existing circuit and be able to
draw up the full schematic by looking at the unit and armed with pencil
and paper.
They'll measure all the Vac and Vdc voltages, and know why they exist.
Then if they replace caps, they will be competent to work out
what values and types of caps are best and in what position.
Unfortunately, its technical work far beyond the capabilities
of many diyers or audiophiles.
I am a working tech, and sometimes have to repair amps after a
succession of
ppl have modified something but without any understanding.
Patrick Turner.- Hide quoted text -
- Show quoted text -
Hi to all respondents.
I am finally back on the air after my internet dsl connection took a
vacation for 5 days. Problem now appears solved.
Thanx for your responses so far. I will try to address all the
comments/suggestions etc in further posts.
This is my second attempt to get these threads going. About an hour
ago I was smack in the midst of a ten minute effort when the power
company said "thats enough" and the power went bye bye.
Please be patient with me and look for further posts later tonight or
tomorrow.
ESTG/
"The time has come, the walrus said
to talk of many things;
Of shoes- and ships- and sealing-wax- of cabbages- and kings-,
And why the sea is boiling hot- and whether pigs have wings".
.....Lewis Carroll
"Through the Looking Glass"- Hide quoted text -
- Show quoted text -
The auricaps are NP - nothing in their description says
otherwise. However, one lead is black and the other is red, and I read
somewhere {not in the Parts Express description) that the black lead
should be connected to the incoming signal and the red to the outgoing
signal. I took this to be some audiofile stipulation not an electrical
requirement.
In any case, I have replaced the originals to see if that solves the
problem. It does not.
The boom came through the speakers.
There are no visible signs of damage inside the unit (no burnt parts
or scorching on the circuit board).
Soldering technique first rate -no solder splashes, bridges, cold
solder joints etc.
I was motivated to replace all the caps because the unit is 23 years
old. I did so in stages, this being the 3rd stage: 1st- update to the
power supply recomended by CJ. 2nd- Changed all caps in the output
sections- used auricaps where CJ no longer stocked parts. Result so
far a very noticeable increase in clartiy/resolution. SO, I got
greedy! decided to change the caps in the power supply that fed base
voltage to the tube plates. Thats where trougle began.
ESTG/- Hide quoted text -
- Show quoted text -
Further note: A picture of the pv5 internals are at this address -
http://www.classicrecordings.on.ca/pv5.htm
The caps in question are the bank of 4 large blue rectangular
components in the foreground of the picture.
ESTG/
Ah, a picture speaks 1,000 words!
I completely re-wired a similar or same CJ preamp during the last 12
months to
give better and reliable working and with provision
for MC using j-fets at the input tube.
It came to me after a guy here in Oz bought it on E-bay.
Full of mods already, and most were very sus.
The guy is happy now he can use MC without so much hiss and hum.
Then he decided to change all the input&output RCAs to Cardas.
Well, he well and truly botched it even though he hadn't changed the
circuit much.
But he changed the arrangement I had for low hum with short leads to the
input
and he had house wall wires for phono input running close to the PT.
Noise was thunderous, so I undid all his wiring, and while he waited,
and gradually, bit by bit the silence came back, and the house wires
went to the bin.
Now you see why I am nearly bald?
Customers i get make me rip my hair out.
But Christ did say, "Father, forgive them, for they know not what they
do..."
And all is forgiven if they grease my palm with a dollar or two.
Patrick Turner.- Hide quoted text -
- Show quoted text -
Hi to all respondents:
Problem solved. PV-5 Playing beautifully in my system.
While PAtrick T's tube gods were asleep, I did the following:
1. Checked collector and emitter of Q3 (see schematic) for +410v and
+310v respectively. Got neither.
2. Checked output voltage (conventional current flow direction) of
bridge D1,D2,D3,D4 for +410v. st C2,C31,R1 junction/ +410v
3. Checked voltage at C31,R1,C3 junction. 0 volts.
4. Inspected circuitry between the last 2 test points. Solder
connection at input of R1 looked cold soldered. (For shame -
especially with my extensive soldering experience. May have ben there
from previous update of power supply. Flexing of board may have made
the point intermittent then fully open.)
5. Removed R1 - checked value. 1.2kohms as specifieed.
6. Replaced R1. Ensured all points cleanly soldered.
7. Checked voltage at collector and emitter of Q3. +410v and +310v
respectively.
8. Checked the new caps. All ok.
9. Again replaced the old caps with the new.
10.Visual inspection, re-assemble unit and place in system. Performs
flawlessly.
Thanks for all the suggestions and help.
BTW. Started in hi-fi hobby since 1972. Over the years-
Built Heathkit aa15 amp, aj15 tuner, aa1640 200wpc amp.
1991 bought Quad Esl 63s with gradient subwoofer and active x-over.
Modified gradient xover for better lf performance.
Replaces Quad 63 panels when they go bad (it happens!).
Bedroom system has kef r105s - replace capacitor in x-over that had
gone bad. This without schematic and only symtom being no output from
midrange.
Dynaco pat5 also in this system. replaced the power transformer in it
and upgraded it to pat-5 bi-fet.
Living room system has pair of AR Lsts. Replaced tweeters and woofers
from time to time.
I live in Nassau Bahamas and to own all the above equipment, self
repair capability is a must.
Again Thanks to all!!!!!!
ESTG/